Reduxとは
ReduxはJavaScriptの状態管理を簡素化するためのライブラリです。
最近使用する機会があったのですが、使い方を一部忘れていて、公式ドキュメントの説明がわかりづらかったので備忘録として使い方を記事に残します。
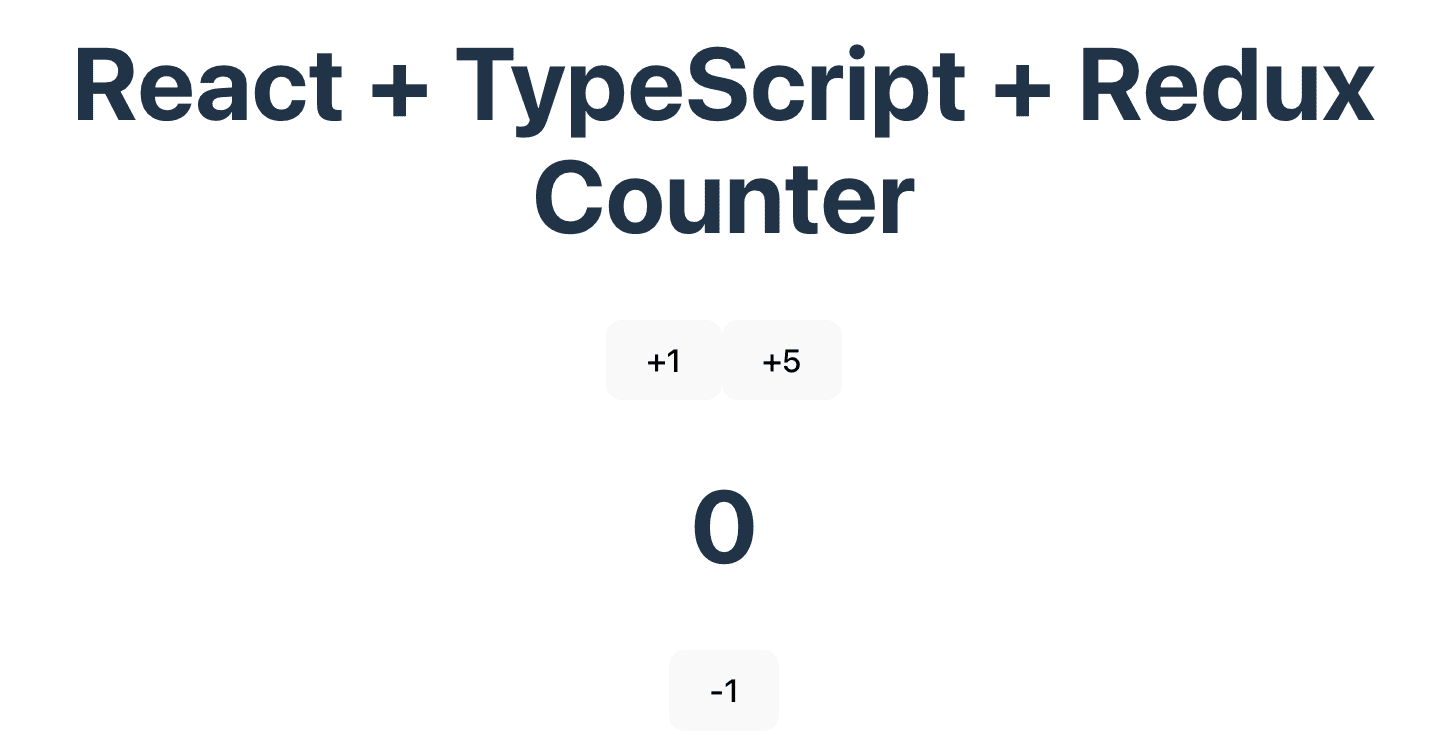
完成形は以下のサンプルです。
React + TypeScript + Redux カウンターサンプル
Ruduxをインストール
まず開発環境を以下のコマンドで作成します。
npm create vite@latest my-react-redux -- --template react-swc-ts作成したら「cd my-react-redux」で移動して、npm installを実行してから、以下のReduxをインストールするコマンドを実行します。
npm i -D @reduxjs/toolkit react-redux今回は例としてReduxを使用して、+1, +5, -1 のボタンがあるカウンターを作成します。
まず、元となる見た目のページをApp.tsxを以下のように変更して作成してください。
import { useState } from 'react'
import './App.css'

function App() {
  const [count, setCount] = useState(0)

  return (
    <div>
      <button onClick={() => setCount(count + 1)}>
        +1
      </button>
      <button onClick={() => setCount(count + 5)}>
        +5
      </button>
      <h1>{count}</h1>
      <button onClick={() => setCount(count - 1)}>
        -1
      </button>
    </div>
  )
}

export default App
npm run devを実行すると、ボタンを押した際に {count} の部分の数字の増減が確認できます。
Redux Storeの準備
src/app/store.tsx を作成して、@reduxjs/toolkitからconfigureStoreをインポートしたコードを作成します。
import { configureStore } from '@reduxjs/toolkit'

const store = configureStore({
  reducer: {}
})

export default store
次にsrc/main.tsxを開いて、先ほど作成したRedux Storeをインポートして、propとしてStoreを渡します。
import { StrictMode } from 'react'
import { createRoot } from 'react-dom/client'
import App from './App.tsx'
import './index.css'
import store from './app/store'
import { Provider } from 'react-redux'

createRoot(document.getElementById('root')!).render(
  <StrictMode>
    <Provider store={store}>
      <App />
    </Provider>
  </StrictMode>,
)
Redux State Sliceを作成する
src/CounterSlice.tsxを作成して、createSliceを@reduxjs/toolkitからインポートします。
Reduxにおける「スライス(slice)」は、アプリケーションの状態管理をモジュール化するための概念です。
createSlice を使用すると、以下のことが簡単に行えます。
- スライスの名前の定義
- 初期状態(initialState)の定義
- リデューサー関数(reducers)の定義
今回作成するサンプルでは初期値0の+1, +5, -1 ボタンのあるカウンターを作成するので、コードは以下のようになります。
コード内に「action.payload」というのがありますが、これはincrementByAmountの引数が反映されるので、例えば incrementByAmount(5)の場合は、action.payloadの値は「5」になります。
import { createSlice } from '@reduxjs/toolkit'

export const counterSlice = createSlice({
  name: 'counter',
  initialState: {
    value: 0
  },
  reducers: {
    increment: (state) => {
      state.value += 1
    },
    decrement: (state) => {
      state.value -= 1
    },
    incrementByAmount: (state, action) => {
      state.value += action.payload
    }
  }
})

export const { increment, decrement, incrementByAmount } = counterSlice.actions

export default counterSlice.reducer
CounterSlice.tsxを作成したら、store.tsxに追加して使用できるようにします。
import { configureStore } from '@reduxjs/toolkit'
import counterReducer from '../CounterSlice'

const store = configureStore({
  reducer: {
    counter: counterReducer
  }
})

export default store
あとはApp.tsxで useSelector, useDispatch を react-redux からインポートして、CounterSlice.tsxで作成した「increment, incrementByAmount, decrement」をインポートしてuseStateから以下のように書き換えれば使用可能になります。
import './App.css'
import { useSelector, useDispatch } from 'react-redux'
import { increment, incrementByAmount, decrement } from './CounterSlice'

function App() {
  const count = useSelector(state => state.counter.value)
  const dispatch = useDispatch()

  return (
    <div>
      <button onClick={() => dispatch(increment())}>
        +1
      </button>
      <button onClick={() => dispatch(incrementByAmount(5))}>
        +5
      </button>
      <h1>{count}</h1>
      <button onClick={() => dispatch(decrement())}>
        -1
      </button>
    </div>
  )
}

export default App
stateの型を追加する
App.tsxが前述のコードだとTypeScriptの場合、stateで「'state' is of type 'unknown'」の警告が表示されます。
これを防ぐには、store.tsxでtype RootStateの型を作成してエクスポートして、stateに適用します。
import { configureStore } from '@reduxjs/toolkit'
import counterReducer from '../CounterSlice'

const store = configureStore({
  reducer: {
    counter: counterReducer
  }
})

export default store
export type RootState = ReturnType<typeof store.getState>import './App.css'
import { useSelector, useDispatch } from 'react-redux'
import { increment, incrementByAmount, decrement } from './CounterSlice'
import { RootState } from './app/store'
function App() {
const count = useSelector((state: RootState) => state.counter.value)
const dispatch = useDispatch()
return (
<div>
<button onClick={() => dispatch(increment())}>
+1
</button>
<button onClick={() => dispatch(incrementByAmount(5))}>
+5
</button>
<h1>{count}</h1>
<button onClick={() => dispatch(decrement())}>
-1
</button>
</div>
)
}
export default App以上の手順が正しくできていれば、Reduxで作成したカウンターが表示されて動作するはずです。
App.tsxとCounter.tsxに分けて使う
このままだとuseStateを使用するのと変わらないので、以下のようにApp.tsxの {count} はそのままにしてボタンをCounter.tsxに移してインポートしてみましょう。
import './App.css'
import Counter from './Counter'
import { useSelector } from 'react-redux'
import { RootState } from './app/store'

function App() {
  const count = useSelector((state: RootState) => state.counter.value)

  return (
    <>
      <h1>{count}</h1>
      <Counter />
    </>
  )
}

export default Appimport { useDispatch } from 'react-redux'
import { increment, incrementByAmount, decrement } from './CounterSlice'
function Counter() {
const dispatch = useDispatch()
return (
<div>
<button onClick={() => dispatch(increment())}>
+1
</button>
<button onClick={() => dispatch(incrementByAmount(5))}>
+5
</button>
<button onClick={() => dispatch(decrement())}>
-1
</button>
</div>
)
}
export default CounteruseStateだとこのようにファイルをわけてインポートする場合はpropsで値を受け取らないと反映されませんが、Reduxで状態管理している場合はpropsがなくても値を受け取れます。
これにより、Reactを使用する際に問題になりやすい、props drilling(バケツリレー)を回避することができます。
以下のリンク先に実行可能なカウンターのサンプルも作成しましたので、ご参照ください。
React + TypeScript + Redux カウンターサンプル