目次
CSSとJavaScriptに最適な環境構築
少し前だとタスクランナーにgruntやgulpなどが使用されていたが、現在はwebpackで作業環境を構築するケースが多い。
最新のwebpack 4なら簡単にCSSとJavaScriptに最適な作業環境を構築できるので劇的な作業効率向上が期待できる。
今回作成したpackage.jsonは下記の通り。以降の説明を見る前にあらかじめnpm installしておくと良い。
{
  "name": "webpack4",
  "version": "1.0.0",
  "scripts": {
    "start": "webpack-dev-server --open --env.dev",
    "build": "webpack --env.dev"
  },
  "devDependencies": {
    "autoprefixer": "^8.4.1",
    "babel-core": "^6.26.3",
    "babel-loader": "^7.1.5",
    "babel-preset-env": "^1.7.0",
    "babel-preset-stage-3": "^6.24.1",
    "clean-webpack-plugin": "^0.1.19",
    "css-loader": "^0.28.11",
    "csscomb-loader": "0.0.2",
    "eslint": "^4.19.1",
    "eslint-config-airbnb": "^16.1.0",
    "eslint-loader": "^2.0.0",
    "eslint-plugin-import": "^2.11.0",
    "eslint-plugin-jsx-a11y": "^6.0.3",
    "eslint-plugin-react": "^7.7.0",
    "extract-text-webpack-plugin": "^4.0.0-beta.0",
    "html-beautify-webpack-plugin": "^1.0.5",
    "html-webpack-plugin": "^3.2.0",
    "node-sass": "^4.9.2",
    "postcss-loader": "^2.1.5",
    "sass-loader": "^7.1.0",
    "webpack": "^4.17.2",
    "webpack-cli": "^3.1.0",
    "webpack-dev-server": "^3.1.7"
  }
}
webpack4での環境構築コマンド
package.jsonのscriptsにstartとbuildを記載しており、開発環境の場合はnpm startを実行して構築する。
webpack-dev-serverを起動させたくない場合はnpm run buildでwebpack --env.devが実行される。
察しの良い人は気づくと思うが--env.devのある・なしでdevelopmentとproductionを分けている。
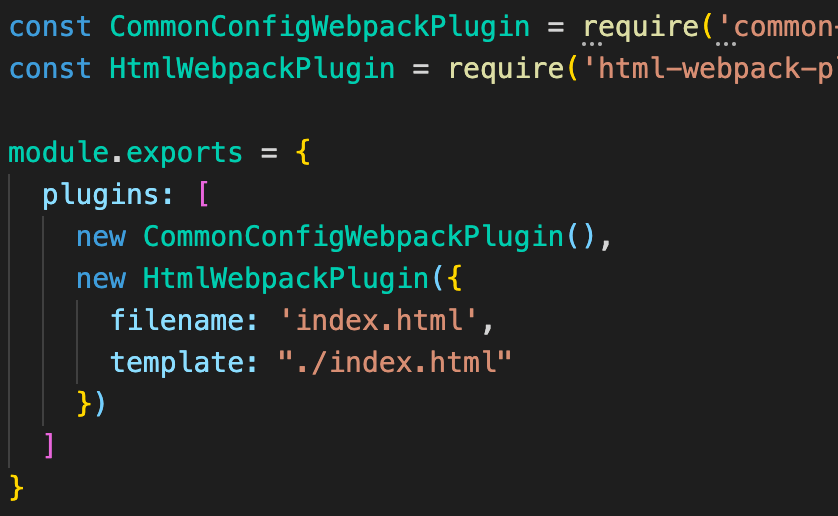
webpack.config.jsについて
webpack.config.jsは基本は以下のように記述。必要に応じてentryやoutputを変更する。
const path = require('path');
const ExtractTextPlugin = require('extract-text-webpack-plugin');
const HtmlWebpackPlugin = require('html-webpack-plugin');
const CleanWebpackPlugin = require('clean-webpack-plugin');
const HtmlBeautifyPlugin = require('html-beautify-webpack-plugin');
const shorthash = Math.random().toString(36).slice(-5);

module.exports = (env) => {
  // webpack --env.dev => isDev: true
  const isDev = env ? env.dev : false;
  console.log(`🔧 isDev: ${isDev}`);

  return {
    mode: isDev ? 'development' : 'production',
    entry: [
      path.join(__dirname, 'src/style.scss'),
      path.join(__dirname, 'src/index.js'),
    ],
    output: {
      path: path.join(__dirname, 'dist'),
      filename: `bundle.${shorthash}.js`
    },
    devServer: {
      port: 3000,
      contentBase: path.resolve(__dirname, 'src/'),
      watchContentBase: true
    },
    module: {
      rules: [
        {
          test: /\.js$/,
          exclude: /node_modules/,
          use: {
            loader: 'babel-loader',
            options: {
              presets: [
                ['env', {'modules': false}]
              ]
            }
          }
        },
        {
          test: /\.js$/,
          exclude: /node_modules/,
          use: ['eslint-loader']
        },
        {
          test: /\.scss$/,
          use: ExtractTextPlugin.extract({
            use: [
              {
                loader: 'css-loader',
                options: {
                  url: false,
                  sourceMap: isDev,
                  minimize: !isDev,
                  importLoaders: 2
                }
              },
              {
                loader: 'postcss-loader',
                options: {
                  sourceMap: isDev,
                  plugins: [require('autoprefixer')]
                },
              },
              {
                loader: 'sass-loader',
                options: {
                  sourceMap: isDev,
                  outputStyle: 'expanded',
                }
              },
              'csscomb-loader',
            ]
          })
        },
      ]
    },
    plugins: [
      new ExtractTextPlugin(`style.${shorthash}.css`),
      new HtmlWebpackPlugin({
        template: './src/index.html',
        copyright: '(c) iwb.jp',
      }),
      new CleanWebpackPlugin(['dist/*.*']),
      new HtmlBeautifyPlugin({
        config: {
          html: {
            end_with_newline: true,
            indent_size: 2,
            indent_inner_html: true,
            unformatted: ['p', 'i', 'b', 'span']
          }
        },
        replace: ['type="text/javascript"']
      }),
    ],
    // JSが複数ある場合はsplitChunksを使用
    // optimization: {
    //   splitChunks: {
    //     cacheGroups: {
    //       commons: {
    //         name: 'commons',
    //         chunks: 'initial'
    //       }
    //     }
    //   }
    // }
  }
};
autoprefixerはデフォルトの設定だと多くのWebサイトで推奨環境内になっているAndroid 4やiOS 8のベンダープレフィックスが付かないため、現在は下記のように設定したほうが良い。
plugins: [require('autoprefixer')({
  browsers: [
    'last 2 versions',
    'Android >= 4',
    'iOS >= 8'
  ]
})]
chunkhashではなくshorthashを使用
一般的にはwebpackではファイルのキャッシュ防止のためにファイル名にchunkhashを付けるのだが、ファイル名が長くなりすぎるため、私はshorthashという定数を作成して付けている。
filename: 'bundle.[chunkhash].js'
// => bundle.0b4853b8bc9bcb7f4fb1.js

filename: `bundle.${shorthash}.js`
// => 'bundle.a0z8y.js'
HtmlBeautifyPlugin推奨
HtmlWebpackPluginをインストールしているためHTMLファイルを書き出し可能だが、書き出し後のHTMLファイルのコードがあまりきれいではないため、気になる人はHtmlBeautifyPluginをインストールしておくことをおすすめする。
<!-- HtmlBeautifyPluginなし -->
<body>
<h1>Webpack 4 Sample</h1>
<script type="text/javascript" src="bundle.js"></script></body>

<!-- HtmlBeautifyPluginあり -->
<body>
  <h1>Webpack 4 Sample</h1>
  <script src="bundle.js"></script>
</body>
.csscomb.jsonと.eslintrcファイルを用意
CSScombとESLintを使用しているため、.csscomb.jsonと.eslintrcファイルを用意しておく。
webpack.config.js内に記述することもできるが、分けておいたほうが見やすく管理もしやすい。
loader以外のインストールも必要
webpackでESLintなどを使用するにはeslint-loaderだけインストールすれば良いと勘違いされることがある。
実際は関連するもの(eslint, eslint-config-airbnbなど)も必要なのでインストールの際は注意が必要。