アイキャッチ画像の位置の変更
WordPressは投稿画面のメディアを追加するボタンまたは右下のアイキャッチ画像からアイキャッチ画像を挿入できる。
しかし、WordPress twentyseventeenテーマだとタイトルの上に画像が表示されてしまう。
一般的なブログはタイトルのテキスト→アイキャッチ画像→記事内容の順に表示させるため、これだと都合が悪いことが多い。
twentyseventeenテーマを修正する
アイキャッチ画像の位置を変更するにはtwentyseventeenテーマのphpファイルを修正する必要がある。
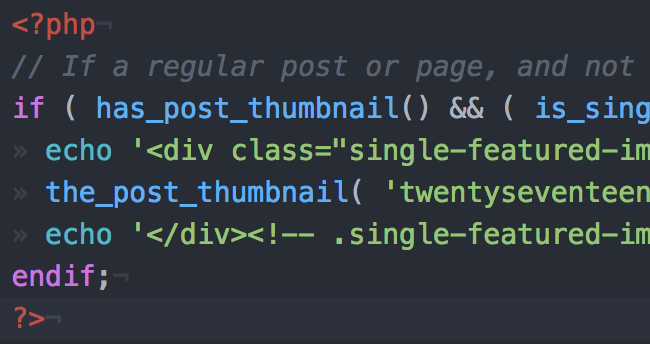
まず、アイキャッチ画像がヘッダー(header.php)に含まれているため、これを切り取り。
<?php
// If a regular post or page, and not the front page, show the featured image.
if ( has_post_thumbnail() && ( is_single() || ( is_page() && ! twentyseventeen_is_frontpage() ) ) ) :
  echo '<div class="single-featured-image-header">';
  the_post_thumbnail( 'twentyseventeen-featured-image' );
  echo '</div>
<img src="https://iwb.jp/wp-content/uploads/2017/10/wordpress-twentyseventeen-post-thumbnail-eyecatch-02.png" alt="" width="720" height="450" class="alignnone size-full wp-image-5760" />
<!-- .single-featured-image-header -->';
endif;
?>
切り取りを行ったコードをcontent.phpのclass="entry-content"の直下に貼り付ける。
<div class="entry-content">
  <?php
  // If a regular post or page, and not the front page, show the featured image.
  if ( has_post_thumbnail() && ( is_single() || ( is_page() && ! twentyseventeen_is_frontpage() ) ) ) :
    echo '<div class="single-featured-image-header">';
    the_post_thumbnail( 'twentyseventeen-featured-image' );
    echo '</div>
<!-- .single-featured-image-header -->';
  endif;
  ?>
以上の手順だけでアイキャッチ画像の表示位置をタイトル上から下に変更することができる。