目次
React使用のTodoタスクツールを作成
Reactを学習していると必ずと言っていいほどその過程でTodoタスクツールを作成することになる。
Todoタスクツールは編集、登録、削除、保存などのReactを使用する上で欠かせない基礎を一通り使用することになるため学習に最適だ。
だが、Todoタスクツールを作成するのは初心者にはそれなりに難しく、簡単かつ実用的なTodoタスクツールの作成方法がネット上に存在しないようなので、自分の復習も兼ねてサンプル付きの作成方法を記載した。(Reactの基礎を学んだ人向け)
JSだけでTodoタスクツールを作成
今回は初心者でも簡単に作成できるようにnpmは使用せずにcdnのreactとbabel-coreのJavaScriptを読み込むだけで作成する方法を掲載している。
<script src="https://cdnjs.cloudflare.com/ajax/libs/react/15.3.0/react.js"></script>
<script src="https://cdnjs.cloudflare.com/ajax/libs/react/15.3.0/react-dom.js"></script>
<script src="https://cdnjs.cloudflare.com/ajax/libs/babel-core/5.8.24/browser.min.js"></script>
<div id="app"></div>
使用するバージョンは15だが2017年11月現在はバージョン16が出ており、こちらを使用することが推奨されている。
ただし、初心者には敷居が高いため、今回はあえてバージョン15でnpmを使用しない方法で作成。
サンプルの下の方にあるuse npmはnpm(React v16.0)を使用した場合のコードだ。
参考として記載しているだけなのでnpm(React v16.0)での作成方法の詳細は割愛している。
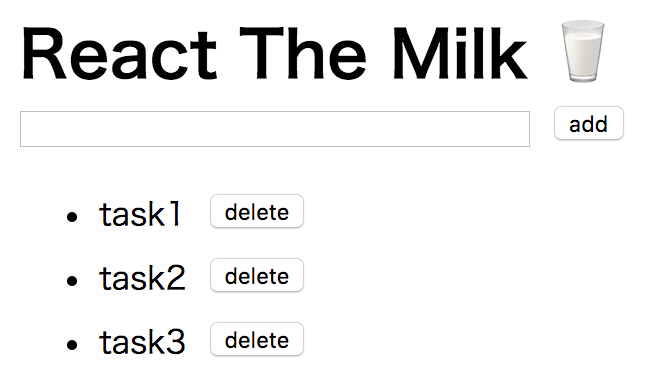
HTMLを作成する
まず最初にTodoタスクツールのHTMLを作成する。
必要なのは入力欄、追加ボタン、削除ボタン、追加後のテキストの4つだ。
<div id="app">
  <input type="text" value=""><button>add</button>
  <ul>
    <li>task1<button>delete</button></li>
    <li>task2<button>delete</button></li>
    <li>task3<button>delete</button></li>
  </ul>
</div>
当然この状態では入力してもタスクは追加されない。
ReactでHTMLを挿入する
次に作成したHTMLのinputやulなどをReactを使用してcontent="app"に入れる。
Reactを使用するには前述の3つのJavaScriptの読み込みが必要だ。
JSXを使用しているためreturn内にHTMLコードをそのまま挿入できるが、JSXはinputなどは<input />ではなく<input>のようにスラッシュで閉じていなければエラーになってしまうため、慣れていない初心者は特に注意が必要だ。
const ToDoList = React.createClass({
  render: function() {
    return (
      <div>
        <input type="text" value="" /><button>add</button>
        <ul>
          <li>task1<button>delete</button></li>
          <li>task2<button>delete</button></li>
          <li>task3<button>delete</button></li>
        </ul>
      </div>
    );
  }
});

ReactDOM.render(
  <ToDoList />,
  document.getElementById('app')
);
サンプル3の見た目はサンプル2と全く同じだがJavaScriptでDOM操作されているかどうかの違いがある。
また、Reactを使用した場合はvalue=""だとinputタグの入力ができなくなるが、これはReactの仕様なので問題ない。
getInitialStateで初期値を設定
getInitialStateで既存の保存されているTodo(todoItems)と新規追加Todo(newItems)を作成する。
const ToDoList = React.createClass({
  getInitialState: function() {
    return {
      todoItems: [
        {name: 'task1'},
        {name: 'task2'},
        {name: 'task3'}
      ],
      newItem: ''
    };
  },
  render: function() {
    const currentItems = this.state.todoItems.map((item, i) =>
      <li key={i}>
        {item.name}
        <button>delete</button>
      </li>
    );
    return (
      <div>
        <input
          type="text"
          value={this.state.newItem}
        />
        <button>add</button>
        <ul>
          {currentItems}
        </ul>
      </div>
    );
  }
});

ReactDOM.render(
  <ToDoList />,
  document.getElementById('app')
);
サンプル4では初期値がtodoItemsが入っているため、必ず最初にtask1, task2, task3が追加されるが、この部分は最後にlocalStorageを使用して保存されたもののみ表示されるように修正する。(詳しくは完成版参照)
onChange追加でvalueを変更する
inputにonChangeを追加してinputに変更があったときにhandleEdit関数が実行されてthis.setState({newItem: e.target.value})でnewItemにvalueが保存されるようにする。
newItemに保存されたvalueはvalue={this.state.newItem}でvalueに挿入されるため、これでvalueの値が変更できるようになる。
const ToDoList = React.createClass({
  getInitialState: function() {
    return {
      todoItems: [
        {name: 'task1'},
        {name: 'task2'},
        {name: 'task3'}
      ],
      newItem: ''
    };
  },
  handleEdit: function(e) {
    this.setState({newItem: e.target.value});
  },
  render: function() {
    const currentItems = this.state.todoItems.map((item, i) =>
      <li key={i}>
        {item.name}
        <button>delete</button>
      </li>
    );
    return (
      <div>
        <input
          type="text"
          value={this.state.newItem}
          onChange={this.handleEdit}
        />
        <button>add</button>
        <ul>
          {currentItems}
        </ul>
      </div>
    );
  }
});

ReactDOM.render(
  <ToDoList />,
  document.getElementById('app')
);
追加ボタンで追加できるようにする
追加ボタンにonClick={this.handleAdd}を付けてhandleAdd関数でinputに入力した内容が追加されるようにする。
if (this.state.newItem) の条件を付けて何も入力されていないときは追加しないように注意する。
getInitialStateのtodoItemsの配列は空にして、newItemをthis.state.todoItems.concat(またはpush)で追加できるようにする。
const ToDoList = React.createClass({
  getInitialState: function() {
    return {
      todoItems: [],
      newItem: ''
    };
  },
  handleEdit: function(e) {
    this.setState({newItem: e.target.value});
  },
  handleKey: function(e) {
    if (e.key === 'Enter') {
      this.handleAdd();
    }
  },
  handleAdd: function() {
    if (this.state.newItem) {
      const item = {name: this.state.newItem};
      const newItems = this.state.todoItems.concat(item);
      this.setState({todoItems: newItems});
      this.setState({newItem: ''});
      this.inputFocus();
    }
  },
  inputFocus: function() {
    document.querySelector('input[type="text"]').focus();
  },
  render: function() {
    const currentItems = this.state.todoItems.map((item, i) =>
      <li key={i}>
        {item.name}
        <button>delete</button>
      </li>
    );
    return (
      <div>
        <input
          type="text"
          value={this.state.newItem}
          onChange={this.handleEdit}
          onKeyPress={this.handleKey}
        />
        <button onClick={this.handleAdd}>add</button>
        <ul>
          {currentItems}
        </ul>
      </div>
    );
  }
});

ReactDOM.render(
  <ToDoList />,
  document.getElementById('app')
);
これで{currentItems}の内容が動的に変更可能となるため、inputに入力後に追加ボタンを押せばTodoを追加できるようになる。
追加ボタンを押すとinputではなく追加ボタンにfocusされてしまい、再度入力したい場合は、inputを再度選択しなくてはならない。
ただ、それだとTodoタスクツールの使い勝手が悪くなってしまうため、別途inputFocusというinputにfocusされる関数を作成して、追加後も続けて入力できるようにしてあります。
あと追加ボタンを押さなくてもEnterを入力すれば追加されるようonKeyPress={this.handleKey}を追加してある。
削除ボタンで削除できるようにする
onClick={() => this.handleDelete(i)}を削除ボタンに追加してspliceで配列を削除できるようにする。
const ToDoList = React.createClass({
  getInitialState: function() {
    return {
      todoItems: [],
      newItem: ''
    };
  },
  handleEdit: function(e) {
    this.setState({newItem: e.target.value});
  },
  handleKey: function(e) {
    if (e.key === 'Enter') {
      this.handleAdd();
    }
  },
  handleAdd: function() {
    if (this.state.newItem) {
      const item = {name: this.state.newItem};
      const newItems = this.state.todoItems.concat(item);
      this.setState({todoItems: newItems});
      this.setState({newItem: ''});
      this.inputFocus();
    }
  },
  handleDelete: function(i) {
    const tempItems = this.state.todoItems;
    tempItems.splice(i, 1);
    this.setState({todoItems: tempItems});
    this.inputFocus();
  },
  inputFocus: function() {
    document.querySelector('input[type="text"]').focus();
  },
  render: function() {
    const currentItems = this.state.todoItems.map((item, i) =>
      <li key={i}>
        {item.name}
        <button onClick={() => this.handleDelete(i)}>delete</button>
      </li>
    );
    return (
      <div>
        <input
          type="text"
          value={this.state.newItem}
          onChange={this.handleEdit}
          onKeyPress={this.handleKey}
        />
        <button onClick={this.handleAdd}>add</button>
        <ul>
          {currentItems}
        </ul>
      </div>
    );
  }
});

ReactDOM.render(
  <ToDoList />,
  document.getElementById('app')
);
ここのthisは他のthisとは対象が異なるためアロー関数を使用せずにthis.handleDelete(i)と記述するとエラーになるので注意が必要だ。
localStorageで保存する
サンプル2から7までの手順で入力、追加、削除ができるようになったが、追加してもブラウザを更新すれば追加した内容は消えてしまう。
これではTodoタスクツールとして使えないため内容をlocalStorageに保存する。
localStorageは文字列しか保存できないためタスク(配列オブジェクト)をJSON.stringifyで文字列に変換して保存し、読み込むときはJSON.parseで配列オブジェクトに戻して使用する。
const ToDoList = React.createClass({
  getInitialState: function() {
    const todo = JSON.parse(localStorage.getItem('todo')) || [];
    return {
      todoItems: todo,
      newItem: ''
    };
  },
  handleEdit: function(e) {
    this.setState({newItem: e.target.value});
  },
  handleKey: function(e) {
    if (e.key === 'Enter') {
      this.handleAdd();
    }
  },
  handleAdd: function() {
    if (this.state.newItem) {
      const item = {name: this.state.newItem};
      const newItems = this.state.todoItems.concat(item);
      this.setState({todoItems: newItems});
      this.setState({newItem: ''});
      this.inputFocus();
      localStorage.setItem('todo', JSON.stringify(newItems));
    }
  },
  handleDelete: function(i) {
    const tempItems = this.state.todoItems;
    tempItems.splice(i, 1);
    this.setState({todoItems: tempItems});
    this.inputFocus();
    localStorage.setItem('todo', JSON.stringify(this.state.todoItems));
  },
  inputFocus: function() {
    document.querySelector('input[type="text"]').focus();
  },
  render: function() {
    const currentItems = this.state.todoItems.map((item, i) =>
      <li key={i}>
        {item.name}
        <button onClick={() => this.handleDelete(i)}>delete</button>
      </li>
    );
    return (
      <div>
        <input
          type="text"
          value={this.state.newItem}
          onChange={this.handleEdit}
          onKeyPress={this.handleKey}
        />
        <button onClick={this.handleAdd}>add</button>
        <ul>
          {currentItems}
        </ul>
      </div>
    );
  }
});

ReactDOM.render(
  <ToDoList />,
  document.getElementById('app')
);
一応これで簡易Todoタスクツールは完成だ。
ただし、localStorageは現在使用しているブラウザに内容を保存しているだけなので、より実用的なものにするためには外部サーバーへの保存が必要だ。
今後はバージョン16(npm)を使用する
今後はバージョン16(npm)を使用するのが一般的になるため、慣れたらReact v16をメインで使用したほうが良い。
React v16はReact.createClassが使用できなかったり、react.jsのファイル名が違うなど、いくつかの大きな変更点があるため、v15しか使用したことがない場合は事前に変更点を確認しておく必要がある。
バージョン16(npm)を使用するときのコードは以下のようになる。
import React, { Component } from 'react';
import ReactDOM from 'react-dom';

class ToDoList extends Component {
  constructor(props) {
    super(props);
    const todo = JSON.parse(localStorage.getItem('todo')) || [];
    this.state = {
      todoItems: todo,
      newItem: ''
    };
    this.handleEdit   = this.handleEdit.bind(this);
    this.handleKey    = this.handleKey.bind(this);
    this.handleAdd    = this.handleAdd.bind(this);
    this.handleDelete = this.handleDelete.bind(this);
    this.inputFocus   = this.inputFocus.bind(this);
  }
  handleEdit(e) {
    this.setState({newItem: e.target.value});
  }
  handleKey(e) {
    if (e.key === 'Enter') {
      this.handleAdd();
    }
  }
  handleAdd() {
    if (this.state.newItem) {
      const item = {name: this.state.newItem};
      const newItems = this.state.todoItems.concat(item);
      this.setState({todoItems: newItems});
      this.setState({newItem: ''});
      this.inputFocus();
      localStorage.setItem('todo', JSON.stringify(newItems));
    }
  }
  handleDelete(i) {
    const tempItems = this.state.todoItems;
    tempItems.splice(i, 1);
    this.setState({todoItems: tempItems});
    this.inputFocus();
    localStorage.setItem('todo', JSON.stringify(this.state.todoItems));
  }
  inputFocus() {
    document.querySelector('input[type="text"]').focus();
  }
  render() {
    const currentItems = this.state.todoItems.map((item, i) =>
      <li key={i}>
        {item.name}
        <button onClick={() => this.handleDelete(i)}>delete</button>
      </li>
    );
    return (
      <div>
        <input
          type="text"
          value={this.state.newItem}
          onChange={this.handleEdit}
          onKeyPress={this.handleKey}
        />
        <button onClick={this.handleAdd}>add</button>
        <ul>
          {currentItems}
        </ul>
      </div>
    );
  }
}

ReactDOM.render(
  <ToDoList />,
  document.getElementById('app')
);