目次
vite-plugin-handlebarsとは
Vite用のHandlebars。
Handlebarsとは
シンプルなテンプレート言語。
例えば以下のように書いて…
<p>{{firstname}} {{lastname}}</p>
それぞれ以下のようなデータがあれば…
{
  firstname: "Taro",
  lastname: "Yamada",
}
以下の結果を返す。
<p>Taro Yamada</p>
HTMLファイルの読み込みも可能なので、例えばヘッダーとフッター用のheader.htmlやfooter.htmlを用意して、以下のような記述で読み込むことができる。
{{> header}}
<h1>sample</h1>
{{> footer}}
vite-plugin-handlebarsを使う方法
まず手始めにViteを以下のコマンドでインストールする。
npm init vite@latest
プロジェクト名などはデフォルト設定で問題ない。
✔ Project name: … vite-project
✔ Select a framework: › Vanilla
✔ Select a variant: › JavaScript
あとは以下のコマンドでViteを起動できるようになる。
cd vite-project
npm install
npm run dev
デフォルトの状態だとルートフォルダにindex.html、style.css、main.jsがあるが、これだとファイルが管理しづらいのでsrcフォルダを作成してsrcフォルダに3つのファイルを移動する。
あとはvite.config.jsを作成して以下のように書けばsrcフォルダ内のファイルが使われるようになる。
vite.config.js
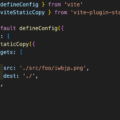
import { defineConfig } from 'vite';

export default defineConfig({
  root: './src',
});
フォルダの構造は以下の通り。
├── src
│   ├── favicon.svg
│   ├── index.html
│   ├── main.js
│   └── style.css
└── vite.config.js
引き続き以下のコマンドでvite-plugin-handlebarsをインストールする。
npm i -D vite-plugin-handlebars
インストールしたらvite.config.jsにplugins (handlebars)を追記してHandlebarsを使えるようにする。
以下のように書けばHTML内の{{title}}が'Hello, world!'になる。
import { defineConfig } from 'vite';
import handlebars from 'vite-plugin-handlebars';

export default defineConfig({
  root: './src',
  plugins: [
    handlebars({
      context: {
        title: 'Hello, world!',
      },
    }),
  ],
});
<!DOCTYPE html>
<html lang="ja">
<head>
<meta charset="UTF-8" />
<link rel="icon" type="image/svg+xml" href="favicon.svg" />
<link rel="stylesheet" href="/style.css">
<meta name="viewport" content="width=device-width, initial-scale=1.0" />
<title>{{title}}</title>
</head>
<body>
<h1>{{title}}</h1>
<script type="module" src="/main.js"></script>
</body>
</html>
※ 今回はSPAとして使用しないのでstyle.cssはHTMLに記述して読み込むようにしている。
HandlebarsでHTMLファイルを読み込む
次にHandlebarsでheader.htmlとfooter.htmlを作成して読み込んでみる。
やり方はまずcomponentsフォルダをindex.htmlを同じところに作成して、その中にheader.htmlとfooter.htmlを入れる。
├── src
│   ├── components
│   │   ├── footer.html
│   │   └── header.html
│   ├── favicon.svg
│   ├── index.html
│   ├── main.js
│   └── style.css
└── vite.config.js
次にvite.config.js内のhandlebarsにpartialDirectoryを追加してcomponents内のファイルを読み込めるようにする。
import { defineConfig } from 'vite';
import handlebars from 'vite-plugin-handlebars';
import { resolve } from 'path';

export default defineConfig({
  base: '',
  plugins: [
    handlebars({
      partialDirectory: resolve(__dirname, './src/components'),
      context: {
        title: 'Hello, world!',
      },
    }),
  ],
});
あとはHTML内に{{> header}}や{{> footer}}を追加すればHTMLファイルを読み込めるようになる。
HTMLファイルを増やす方法
これまではindex.htmlだけしかない前提で説明したが、もしcontact.htmlのような別のHTMLファイルもある場合は、HTMLファイルをコピーして増やすだけだとnpm run devでは/contact.htmlで表示できるが、npm run buildを実行した際にcontact.htmlがdistフォルダに生成されない。
build時に対象のHTMLを増やすにはvite.config.js内にbuildを指定して個別にHTMLの場所を以下のように書く必要がある。(以降からimportの記述は省略)
export default defineConfig({
  root: './src',
  base: '',
  build: {
    rollupOptions: {
      input: {
        index: resolve(__dirname, './src/index.html'),
        contact: resolve(__dirname, './src/contact.html'),
      },
    },
  },
  plugins: [
    handlebars({
      partialDirectory: resolve(__dirname, './src/components'),
      context: {
        title: 'Hello, world!',
      },
    }),
  ],
});
※ ここからはbuild後のファイルのパスが/css/〜のようにならないようbase: ''もdefineConfigも設定しています。
静的ファイルはcss, js, imgのようにフォルダ分けしたほうが管理しやすいので追加でoutputも以下のように指定してフォルダ分けして書き出せるようにする。
export default defineConfig({
root: './src',
base: '',
build: {
outDir: '../dist',
rollupOptions: {
input: {
index: resolve(__dirname, './src/index.html'),
contact: resolve(__dirname, './src/contact.html'),
},
output: {
chunkFileNames: 'assets/js/[name].[hash].js',
entryFileNames: 'assets/js/[name].[hash].js',
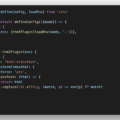
assetFileNames: ({name}) => {
if (/\.(jpe?g|png|gif|svg)$/.test(name ?? '')) {
return 'assets/img/[name].[hash][extname]';
}
if (/\.css$/.test(name ?? '')) {
return 'assets/css/[name].[hash][extname]';
}
return 'assets/[name].[hash][extname]';
},
},
},
},
plugins: [
handlebars({
partialDirectory: resolve(__dirname, './src/components'),
context: {
title: 'Hello, world!',
},
}),
],
});
これだと両方とも{{title}}が'Hello, world!'になってしまうので、contextを以下のように修正してpageDataのオブジェクトにそれぞれのtitleの値を入れる。
dev serverを停止してnpm run devで再起動するとそれぞれのページの{{title}}が反映されているのがわかる。
import { defineConfig } from 'vite';
import handlebars from 'vite-plugin-handlebars';
import { resolve } from 'path';

const pageData = {
  '/index.html': {
    title: 'トップページ',
  },
  '/contact.html': {
    title: 'お問い合わせ',
  },
};

export default defineConfig({
  root: './src',
  base: '',
  build: {
    outDir: '../dist',
    rollupOptions: {
      input: {
        index: resolve(__dirname, './src/index.html'),
        contact: resolve(__dirname, './src/contact.html'),
      },
      output: {
        chunkFileNames: 'assets/js/[name].[hash].js',
        entryFileNames: 'assets/js/[name].[hash].js',
        assetFileNames: ({name}) => {
          if (/\.(jpe?g|png|gif|svg)$/.test(name ?? '')) {
            return 'assets/img/[name].[hash][extname]';
          }
          if (/\.css$/.test(name ?? '')) {
            return 'assets/css/[name].[hash][extname]';
          }
          return 'assets/[name].[hash][extname]';
        },
      },
    },
  },
  plugins: [
    handlebars({
      partialDirectory: resolve(__dirname, './src/components'),
      context(pagePath) {
        return pageData[pagePath];
      },
    }),
  ],
});
以上の手順の完了後にnpm run buildで作成したページをサンプルとしてサーバーにアップしました。
srcフォルダのファイルやvite.config.jsなどをまとめたzipファイルも用意しましたので、前述の手順でうまくいかない場合はこちらのファイルを参考にすると良いです。
vite-plugin-handlebarsで作成したページのサンプル